VendorManager™
Version 1.04
User’s Guide
Version 1.0

VendorManager™
Version 1.04
User’s Guide
Version 1.0
Viewing and Selecting Information
Chapter 2: Getting Started with Vendor Manager
Chapter 3: Adding and Maintaining Services
Chapter 4: Adding and Maintaining Vendors
Maintaining Vendor Information
Chapter 5: Mapping and Ranking
Establishing Vendor/Service
Relationships
Disassociating a Service from a
Vendor
Chapter 6: Security, Authentication
and Operator Setup
Operator and System Configuration
The
main window in Vendor Manager 1.0 (VM) is utilized for day-to-day operations.
It is intended to provide a dictionary of vendors that provide certain
services. Finding a vendor for a particular service is as easy as selecting a
service in the “Services” list on the left of the window.
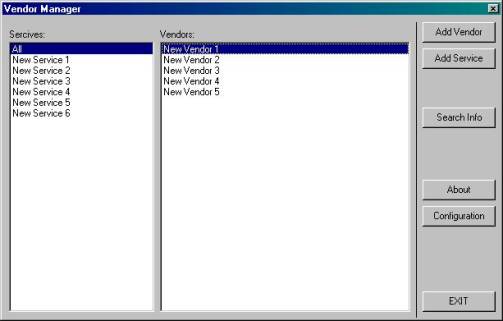
VM
will instantly update the “Vendors” list on the right with the vendors that
have been pre-selected to provide the desired service. The Vendors are sorted
by ranking as configured for the selected service. This allows a user to
instantly see which vendor is the primary choice and which to call if the first
choice vendor is not able to deliver.
The
“Add Vendor” and “Add Service” buttons are used to create new entries for each
of these categories and configure them.
The
“Exit” button terminates the VM program.
To
display the list of vendors for a different service, left-click (single click) the
desired entry in the “Services” list. The default choice ”All” is always
present and shows all existing Vendors in Alphabetical order.
To
open specific Vendors’ detail information or modify it, single-click on the
Vendor’s entry in the “Vendors” list.
You
can search for vendors with specific information stored in their respective
“Info” field. The intent is to add more granularity to the selection
capabilities. The services are utilized to identify groupings of services like
“Computer Hard- and Software” or “Building Maintenance”. However you may find
it more fitting to search for specific offerings or products such as “Network
cables” or “Air Conditioning Repair”.
The
“Search” window appears upon clicking the “Search button on the main window.

In
the blank text field type your search criteria. You have several options for
searching:
![]() Search
for a single word by typing it into the text field
Search
for a single word by typing it into the text field
![]() Search
for a collection of options by typing them into the field but separating them
over multiple lines by ending each word with the <Enter> key
Search
for a collection of options by typing them into the field but separating them
over multiple lines by ending each word with the <Enter> key
![]() Search
for a phrase by typing the exact phrase like “A/C Service and Repair”
Search
for a phrase by typing the exact phrase like “A/C Service and Repair”
![]() Search
for any combination of the above
Search
for any combination of the above
Your words may be complete or partial so you can increase the result range by leaving out nuances like finding ”Electronics” and “Electrical Circuits” by searching for “Electr”.
Further you may substitute
individual characters with wildcards. These can be a “_” character to replace a
single letter or a “%” character to replace an undefined number of characters.
Examples:
“Vend% Service” returns
“Vending
Machine Service” as well as “Vending Service” or “Vendor Service”
“Pump #_ Service” returns
“Pump #1 Service” but not ““Pump #12 Service”
To specify a literal “_” or “%” character you must precede it with a “\” character.
To specify a literal “\”character you must you must type “\\”.
To search for the literal “Fix_Discount: 10% off Repairs”
you must type “Fix\_ Discount: 10\% off Repairs”.
You initiate the search by clicking the search window’s “Search” button. The results are shown in the main window’s vendor list.
Important:
When searching for words or phrases the results are compiled across all defined services allowing you to find vendors offering the same or similar products even though they might have been assigned different services.
User The “Close” button to close the search window.
The “Clear” button erases the content from the text field in the search window but does not change the current search results in the main window.
Vendor
Manager works as a representation of a matrix of information in multiple
dimensions. The basic data elements, Services and Vendors, are entered
independently and then organized in context by establishing mapping and
rankings between them.
VM
must first be fed the information to display. This is done by using the
“Service Maintenance” and “Vendor Maintenance” windows and following these
steps:
1.
Add the Services you
want to appear in the “Services” list in the main Window (refer to “Adding and
Maintaining Services”).
2.
Add the Vendors you want
to appear in the “Vendors” list in the main window (refer to “Adding and
Maintaining Vendors”).
3.
Assign the services each
vendor provides in the “Vendor Maintenance” window (see ‘Establishing
Vendor/Service Relationships’).
4.
Set the preference order
in which vendors appear in the Vendor list for each service in the “Service
Manager” window (see “Changing Vendor Ranking”)
There
are several limitations that are essential to VM’s basic functionality:
a.
All Service Names must
be < 50 characters in length and must be unique.
b.
All Vendor Names must be
< 80 characters in length and must be unique.
c.
Avoid the use of special
characters, !?/\[{}];:”^, where
possible to avoid sorting and data retrieval problems.
d.
Make sure you understand
the current assignments for a service before reusing an existing entry for a
new vendor or service. In general, it is better to delete an unused service or
vendor and then create a new one. This procedure ensures that all links to the
unused service or vendor are eliminated.
e.
You can only enter
999,998 Vendors. This limitation is by design and has been chosen for
performance reasons. It can be increased through a code change if desired.
To
add a new service click the “Add Service” button on the main Window. The
“Service Maintenance” window appears with a default new Service named by “New
Service ###” where ### is the next available number that VM will use internally
to identify the service. The other fields in the window are empty at this time.
You can change the Service Name and Description as you wish and click the
“Save” button to write the information to the database.
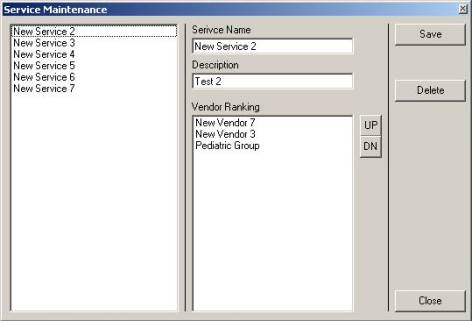
Ideally
you will never change the Service Name or Description of an existing service.
However, if you’d like to do so or change the vendor ranking for a specific
service, simply double-click the service in the “Services” list on the main
window. Once the Service Maintenance Window is open you can use the Service
list on the left of the window to change your service selection.
Remember
to click the “Save” button whenever you leave a service that you made
modifications to or before closing the “Service Maintenance” window.
To
delete a service, open the “Service Maintenance” window as described above,
select the service to be deleted in the list on the left of the window and
click “Delete”. You will be asked to confirm the deletion before VM actually
removes all references to the service.
THIS
PROCESS IS NOT REVERSIBLE! Once a service has been deleted, all information
about the service including the mappings to all vendors providing the service
and the Ranking are gone.
To
add a new Vendor, click the “Add Vendor” button on the main Window. The “Vendor
Maintenance” Window opens with only the “Name” field filled in. The default name
for a new Vendor is “New Vendor ###” where ### is the next available vendor
number used by VM to identify the record. After typing the appropriate
information into each field you must save the new vendor by clicking the “Save”
button.
To
view or modify a specific vendor’s information click the vendor’s entry in the
“Vendors” list in the main window. This opens the “Vendor Maintenance” window
and loads the selected vendor’s information. You can modify the information in
the white text boxes. Once you are satisfied with your modifications, click the
“Save” button to write your changes to the database and make them permanent. Be
sure to always click ”Save” after making modifications to a vendor’s
information before either selecting a different vendor from the drop-down list
at the top of the window or closing the “Vendor Maintenance” window.
The
bottom half of the “Vendor Maintenance” window contains three special use
fields:
![]() The
“Contacts” field is used to capture multiple contact names, locations or phone
numbers. It is a free-form text filed that can be edited in the same way a text
document is typically edited in “Notepad”.
The
“Contacts” field is used to capture multiple contact names, locations or phone
numbers. It is a free-form text filed that can be edited in the same way a text
document is typically edited in “Notepad”.
![]() The
“Info” field works the same way as the “Contacts” field. It is used to capture
narrative style information about the vendor, remarks, history and other useful
things. The separation between the two fields is purely for usability purposes
but there is no limitation as to the content or usage of these fields.
The
“Info” field works the same way as the “Contacts” field. It is used to capture
narrative style information about the vendor, remarks, history and other useful
things. The separation between the two fields is purely for usability purposes
but there is no limitation as to the content or usage of these fields.
![]() The
“provides Services” field can not be edited. It is a list of services provided
by this vendor, established as described in “Establishing Vendor/Service
Relationships”.
The
“provides Services” field can not be edited. It is a list of services provided
by this vendor, established as described in “Establishing Vendor/Service
Relationships”.
To
delete a vendor, open the “Vendor Maintenance” window as described above,
select the vendor to be deleted in the drop-down list at the top of the window
and click “Delete”. You will be asked to confirm the deletion before VM
actually removes all references to the service.
THIS
PROCESS IS NOT REVERSIBLE! Once a vendor has been deleted, all information
about the vendor including the mappings to all provided Services and the
Ranking for each of those services is gone.
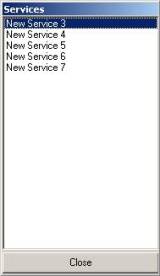 Establishing Vendor/Service Relationships
To
establish a relationship between a vendor and a service you must first ensure
that the service exists in VM. Open the Vendor’s information as described
above. By single-clicking on the “Add” button or an existing service entry in
the “provides Services” list you open the “Services” window which provides a
list of available services you can associate with the vendor.
By
single-clicking an entry in the list you establish the relationship between the
Service and the selected vendor. This updates the mapping table and refreshes
the list automatically and the service you just added to the vendor disappears
from the list. By default a new association puts the vendor at the bottom of
the vendor list for the service. If you don’t want to prioritize this vendor
over others for the service you can just leave the configuration as is. Please
refer to “Changing Vendor Ranking” for more information.
In
the event a vendor no longer provides a particular service, you can
disassociate the vendor from the service. Open the vendor’s information as
described above and then double-click on the service the vendor has
discontinued. You will be asked to confirm the disassociation before VM deletes
the mapping. This process also eliminates the vendor’s ranking for the
discontinued service. You have to re-establish a new ranking if you
re-associate the vendor with this service. (see “Changing Vendor Ranking”)
Vendor
Manager maintains ranking information on a “by Service” basis. This allows you to
establish vendor rankings for each service individually. While a vendor may be
your first choice when it comes to service A, they may lower or even last
choice as a provider for Service B.
When
a relationship is established between a Vendor and a Service, the vendor is
added to the bottom of the list for that service. This is the default display
order for the vendors for each service. It is more desirable to have the
vendors listed in the order in which you prefer
to use their services.
This
is done by changing the order of the vendors in the “Vendor Ranking” list of
the “Service Maintenance” Window.
To
change the Vendor ranking for a particular service you must first open the
“Service Maintenance” window for the service as described above. Then select the
vendor you want to move up or down in the list. Use the “UP” and “DN” buttons
to change the vendor’s position in the list. Continue this with every vendor
you want to move up or down. When you’re done, close the “Service Maintenance”
window. You do not need to click the “Save” button unless you have edited the
Service Name or Description. All Ranking changes are immediately permanent
after they were made. The changed display order appears then next time you
click on the Service in the main window.
You may wish to restrict
individual users’ access to the Service and Vendor data. For example you may
reserve the right to make changes to the vendor and service data yourself and
allow anyone to view the data. This can be accomplished by means of creating
and maintaining Operator Ids in VendorManager and assigning them the
appropriate access permission.
There are three access levels
implemented in Vendormanager:
![]() Viewers
Viewers
are allowed to view all data in the tool.
![]() Users
Users
have all Viewer level permissions but are also allowed update the data
![]() Administrators
Administrators
have all Viewer and User permissions and are allowed to maintain Operators and
change global settings in addition.
To ensure only specific
individuals access certain data all users will be asked to authenticate when
they reach the next level of permission required for the desired change. VendorManager handles these either as persistent
permissions or as on-demand permissions. To maintain the permission level of a
particular user throughout the entire time the application is running
(persistent permissions) a operator must enter their user ID and Password in
the firs Authentication window (shown below) that appears when the
VendorManager is started.
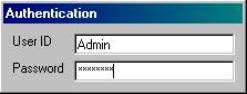
Once successfully authenticated
the user will never be asked to authenticate again until they exit and restart
VendorManager or attempt an operation that exceeds their assigned permissions.
The Operator has the option to escape (hit the “Esc” button) out of the first
authentication window. This will establish on-demand authentication mode. The
operator will be asked to provide a user ID and password every time they
attempt an operation that exceeds the Viewer level permissions.
The “Configuration” button on
the main window opens the Operator maintenance Window. Depending on the current
settings you may receive an authentication request.
Any operator accessing the
VendorManager configuration must have administrator level permissions assigned
to them or access will be denied. The default user ID in the system after
installation is “admin” and the associated password is “password”.
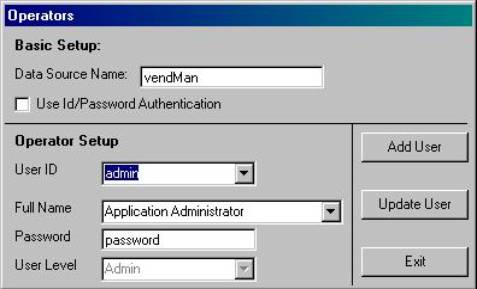
In the top part of the “Operators”
window the administrator has the option to change the name of the ODBC Data
source VendorManager utilizes to connect to it’s database. This may be helpful
if another tool uses the same data source name for its connection or if more
than one database exists.
Below the “data Source Name”
field is a checkbox that indicates and changes the security mode of
VendorManager on the local computer. The Administrator can decide to globally
turn the permissions management on or off. If the checkbox is checked the above
mentioned security features and authentication modes apply. If unchecked,
vendorManager will never ask an operator to authenticate and all Operators have
access to view and update all data including Operators and the “configuration”
button.
The Administrator may add user
by clicking the “Add User button. This will create a temporary account record
that can be edited by the Administrator. To make the new account permanent the
Administrator must click the “Update User” button.
The Administrator can select
any existing user’s account by clicking the dwon arrow to the right of the
“User ID” or “Full Name” fields. This will display a respective list of
accounts from which the Administrator may select the one to be updated. Changes
are made by simply editing the three fields and assigning user level
permissions by means of using the respective drop-down list. To make any change
permanent the Administrator must click the “Update User” button.
The Administrator may choose
any user’s account from the “User ID” or “Full Name” lists and the remove them
from VendorManager by clicking the “Delete User” button that appear on any
Administrator created accounts. The default Administrator account may be edited
and updated but is cannot be deleted in order to guarantee continuous
functionality of the application.
If you like this product please
feel free to contact us at:
In
Scope Solutions, Inc.
1424
Cross Bend Rd.
Plano,
TX 75023
Phone:
++1 972 312 9595
Fax: ++1 972 312 9470
Email:
sales@in-scope-slution.com
Web: http://www.in-scope-solutions.com
If you don’t like the product
or have suggestions for improvements please let us know as well.